Release notes – Exclusively for the E2
New requested features and debugging based on user feedback.
NEW FEATURES
1. Auto bed-leveling
Click “Move Axis > Leveling” to enter the automatic leveling page. You can choose the “Full Mode”, 63- points (9*7) leveling, or the “Simple Mode”, 9 points (3*3) leveling as required.

Select “Simple Mode” and the machine will automatically flatten at 9 points.

After leveling, the leveling results are shown in the figure below. You can also click “ ![]() ” to view the leveling result.
” to view the leveling result.

Click the “2D” icon to switch to a flat view to view the leveling result.

Click “ ![]() ” to enter the Auto-leveling setting page.
” to enter the Auto-leveling setting page.

2. Intelligent leveling focusing on printing area
With the leveling optimization function on, the printer will automatically level the area of the model before each print.

3. Built-in Offset Calibration guides
Click “Setting > Maintenance > Offset Calibration” to enter the calibration wizard. Be sure to satisfy all three of the following conditions before executing the wizard.

(1)The material of both nozzles is Raise3D Premium PLA.
(2)The nozzle diameter must be 0.4mm (the original nozzle diameter of the machine is 0.4mm).
(3)Clean the heatbed and nozzle.
After confirmation, click “Start” to confirm again that all the above conditions are met.
(pop-up windows)
Click “Next” to enter the sub-item selection page. As shown in the figure:

The wizard is divided into the following five steps, which we strongly recommend that you complete in sequence.
3.1. Z offset of the left nozzle.
The Z-direction offset of the left nozzle is the distance from the nozzle to the build plate when the probe is triggered.
If the distance is too far, the print will not stick to the build plate and the printing shape will be deformed.
Too close to the extruder will lead to too little extrusion, nozzle scraping the floor and other problems.
Click “Next” to start measuring. Clean the nozzle and build plate before measuring.

Click “Next”. Wait for the extruder to move to the specified location.

After waiting for the nozzle to move to the specified position, place the feeler between the nozzle and the build plate according to the instructions of the wizard, and select the lift or drop nozzle until the nozzle just touches the feeler.

If the nozzle is far from the feeler, choose to lower the nozzle downward. If the nozzle and the feeler are too close to insert the feeler, lift the nozzle up.
After adjusting the nozzle position, click “Next” and wait for the machine to print the calibration line. After printing, follow the prompts to select the first wavy line. Click “Next”.


The offset measurement results are shown in the following figure:

3.2. Z offset of the right nozzle.
The Z-direction offset value of the right nozzle is measured in the same way as that of the left nozzle. Please follow the instructions to make the measurements.

3.3. Bed leveling
Click “Next” to start leveling the heatbed.

The leveling process will take about 3 minutes (for Simple Mode). Please be patient.

The result page of leveling is displayed in 3D, which can be switched by clicking the “2D” button.

3.4. Offset in the X/Y direction of the right nozzle
The X/Y offset of the right nozzle refers to the X/Y offset of the right nozzle relative to the left nozzle. Click “Next”.

The printer will automatically calibrate the print of the model. The whole process will take about 10 minutes. Please wait patiently until the print is finished.

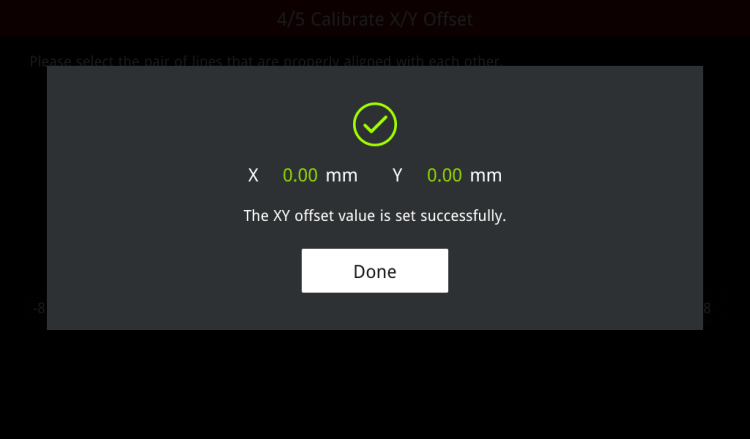
After printing, follow the wizard instructions to select a set of lines that are vertically aligned. Click “Next”.

The measurement results are shown in the following figure:
3.5. Dual-Color Cube
The fifth step is to verify whether the X/Y offset value of the right nozzle is measured accurately by printing a dual-color cube. Click “Next”.

The dual-color cube will take about 15 minutes to print. Please wait until printing is finished.

After printing, compare the images in the wizard.


4. Automatic pause if any door is opened
This feature can be enabled in “Setting > More Setting > Privacy and Security”.
With this feature enabled, the printer pauses the printing task if the top lid or front door is opened during the printing process.
When the door closes, the print task will automatically resume.

Note: This feature is turned off by default.